|
Back to Blog
Week 12: The final week!5/19/2024 This was the last week of my 12-week project and I am satisfied and proud of my results. This was my fourth and last attempt at making the Starbucks cake pops. Compared to the first attempt I had a huge improvement. I am glad that my little failures didn't provoke me to give up. I discovered a new hobby that I enjoy doing in my free time. Baking has helped me when I am stressed out or even to take my mind off things. I used the same ingredients and steps from my third attempt. The difference with this week was that I added less powdered sugar in the stand mixer when I added the cake mix after it was baked. The powdered sugar made it moist and sweet. In the past, I tried using cream cheese to mix it all but it just made it runny. I found many different techniques on Pinterest and Instagram that have helped me with my improvement. These techniques included adding powdered sugar instead of cream cheese, using a stand mixer instead of your hands, and melting the chocolate melts in a glass jar instead of a bowl. 12 weeks was the right amount of time for this project. It gave me time to plan and prepare what I wanted my project to focus on. If we had even a couple of weeks less my results would not be as good as they are. What I liked about my project was that even if one week we were stressed about that week that was what we could talk about in our blogs. It didn't always have to consist of doing our project. I would do this project all over again if I had to choose. I learned many techniques and skills I thought I never had in just 12 weeks. I will continue to bake in my free time and continue to learn more about the kitchen. 
0 Comments
Back to Blog
Week 11:Catch Up5/13/2024  This is week 11 of my project. I have new ideas for my last trial for making Starbucks cake pops. I have been stressed out from all my school work for all my other classes including finding time to bake. I have gotten better at making time for my project. I just have gotten behind these past few weeks. I am taking this week to plan and catch up on all my work for all my classes.
There are a few major changes that have to be made next time I make my cake pops. This includes not putting so much powdered sugar in the stand mixer when the cake is fresh out of the oven. This causes the cake to moisten too much and become runny. I need my cake pops moist but also thick enough to roll into even balls. I want to be happy and proud of myself for my results for the 12 weeks I have been working on this project. I am 75 Percent there and I want to be 100 percent happy with my results. There have been major results from my first attempt to know of my skills. I have learned different measurements, different methods for ingredients, and how to properly cook a meal for my family. I am excited to see how my last attempt will go. I want to see if I can make the cake pops without using the recipe or videos I always watch to see if I can memorize the steps correctly. Last time I tried to attempt this but I always forgot a step and missed an ingredient. Since I don't want to mess up my final attempt I will double-check myself before adding an ingredient, measuring, or how to melt the chocolate correctly. I am excited about my results.
Back to Blog
Week 10:Making cake pops5/12/2024 This was my third attempt at making the cake pops. This time I had all the ingredients I needed including the cake mix, powdered sugar, vanilla extract, popsicle sticks, and most importantly pink chocolate melts. The last time at the grocery store I went to they only had white chocolate melts not pink so I thought I would add red food coloring to the white chocolate when I got home. When I got home I looked and there was no red dye so I made them without the pink chocolate. My second attempt at the cake pops had a better shape. These cake pops had more of a round shape. This time I tried to make them the same size so I used an ice cream scooper to scoop the cake mix and roll them into balls. Using an ice cream scooper would make a difference in shape and size but based on my second attempt it's better to scoop them out by hand. I used the same steps as I did in my second attempt. First I baked the cake. Second, after the cake was baked I poured it right into the stand mixer with some powdered sugar and vanilla extract. Third, when it was all mixed I made the cake balls with the ice cream scooper and placed them in the fridge to cool. Fourth, once all the cake balls were hardened I melted a handful of chocolate and put it in the microwave for 20-second intervals. I stuck the popsicle stick in the melted chocolate and into the cake pops. Fifth. Once the chocolate settled in the cake pops I melted the rest of the chocolate and stuck the cake pops in the chocolate to coat them. The cake pops could have turned out better for how much I have learned every time I have made these and I decided I am going to make them one more time before the 12 weeks are over. 
Back to Blog
Week 9: Making Bundt Cake4/28/2024 Since I only have 3 more weeks left of the project I wanted to make one more dessert while I spent the last couple weeks making the cake pops again. I wanted to make something delicious and easy. I decided to make a bundt cake. This cake is moist, fluffy, and golden to perfection. This cake is dense but not heavy while still staying rich and buttery. Ingredients include 3 cups of all-purpose flour, 1 tsp baking powder, ½ tsp baking powder, 1 and ½ tsp salt, 1 cup unsalted butter, 8 punches cream cheese, 2 cups granulated sugar, 6 large eggs, 1 tbsp vanilla extract, 1 cup whole milk. There are 6 steps in this recipe. First, In a large mixing bowl, beat the butter and cream cheese until smooth and pale yellow. Second, add the sugar and beat at medium speed until light and fluffy, for about 5 minutes. Third, add 3 eggs, one at a time, then add 3 tablespoons of the flour mixture. Continue adding the 3 eggs, one at a time. Beat in the vanilla extract before mixing ⅓ of the flour mixture at low speed in a stand mixer until combined. Add half of the milk and mix until combined. The fourth step is to add the batter to a battered and floured 12-cup bundt pan. Preheat the oven to 350 and bake for 45 minutes and insert a toothpick to check if it is golden brown. The last step is to put on a plate and serve! This recipe was delicious. If you want to save the cake for later you can freeze it. Wrap the vanilla cake with plastic wrap and tin foil before freezing for up to 3 months. This cake can be served with coffee, fruit tarts, macarons, and eclairs. You can also add glaze on top, which is common in bundt cakes but I wanted to keep mine plain and simple. 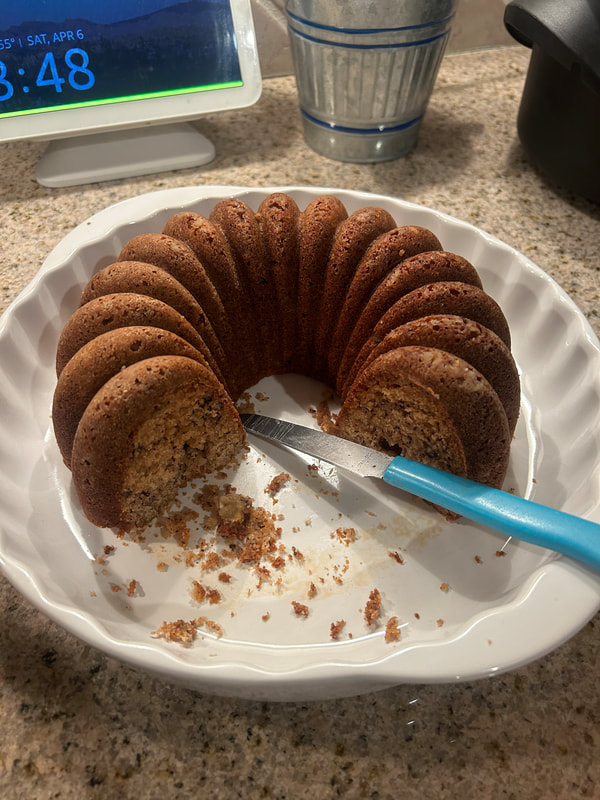
Back to Blog
This is week 8 of the 12-week project and my second attempt at making the Starbucks cake pops. I knew I had to make a couple of changes including how to dip the melted chocolates in and instead of using cream cheese like I did last time I am supposed to use powdered sugar and vanilla extract when mixing the cake mix out of the oven. Ingredients needed are vanilla cake mix, powdered sugar, chocolate-colored melts, and lollipop sticks. There are about 7 steps to this recipe. The first step is to prepare and bake the cake mix according to the boxed directions. The second step is to pour the hot cake immediately after taking it out of the oven into a stand mixer and add powdered sugar and vanilla extract. I did not measure how much-powdered sugar I put in, I just did little by little. Third, portion out the dough and press it into a ball in the palm of your hands or with a cake pop press. The fourth step is to place the cake balls on a cookie sheet and then into the freezer to cool. Fifth, melt the chocolate melts in the microwave for 20-second intervals. The sixth step is to remove the cake balls from the fridge, dip each lollipop stick into the candy melt, and press the stick into the center of each cake ball. This will help prevent the cake pop from falling off. The seventh step is to pour the remaining melted chocolate into a tall, skinny jar. Dip the cake pops one by one in the candy melt and gently shake the cake pops to remove any excess melted chocolate. The eighth step is to allow the candy to melt while the cake pops right side up and put it into the fridge for the last time to harden. My cake pops turned out a lot better than last time. The grocery store did not have pink cake melts so I bought the white ones thinking I could add red dye to them but when I got home I had used all the red dye on my first attempt. Other than that they look amazing. Next time I know I must buy red dye for my final attempt. 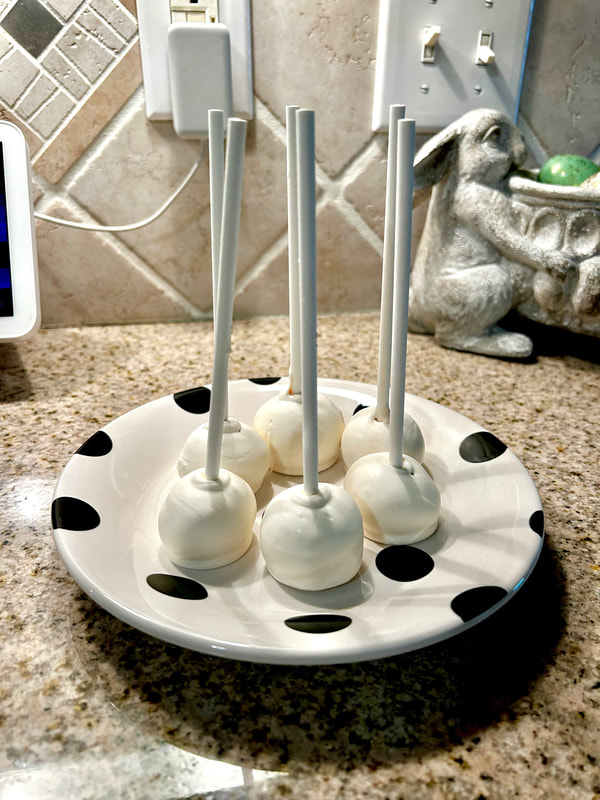
Back to Blog
Week 7: Catch up week4/7/2024 This is week 7 of my project. I took this week to catch up with new recipes and ideas for my project. I have been feeling stressed out since it’s the first week back from spring break and I have so many assignments to accomplish for other classes. I decided that for week 8 of the project, I would attempt to make the Starbucks cake pops again. The first time I made these cake pops was in week 3 so it has been a couple of weeks since I have tried my first attempt. I need to make more time for preparation and organization. I have gotten into the routine of making dinners and desserts that I have forgotten about making the cake pops. On week 3 I did well making the cake mix filling for the cake pop but I need the cake pops to look prettier than my first attempt. Everything went well until it was time to dip the cake mix balls in the icing. Every time I have made these cake pops in the past the chocolate melts is what becomes difficult for me. Either I overcook the chocolates and the chocolate becomes brown or the cake pops fall off the stick and into the chocolate and I have to get it out with my hand. I found videos on Instagram on how to dip the cake pops into the chocolate that I have saved which will hopefully make my second attempt a success. I will purchase the same items for the same flavor and type of cake pop I plan on making. I purchased a vanilla cake mix, eggs, popsicle sticks, cream cheese, and melting chocolate. I noticed a few changes I can make in week 8 that will increase my baking skills. Over these several weeks, I have learned many techniques and skills that will help me in the future. 
Back to Blog
Week 6: Making spanakopita4/7/2024 I am now on week 6 of the project. I decided since I was fasting because of Easter, I wanted to make a side that was healthy and meat-free. I made a Greek dish called spanakopita. This Greek dish is made of crispy layers of phyllo dough and a filling layer of spinach and feta cheese. This savory spinach pie is a pastry eaten throughout the Balkans. The filling is made of chopped spinach usually feta or white cheese, and egg. Spanakopita makes a great side dish for large holiday dinners but can easily stand alone as a small dish. You can also serve it with a big salad and dips. It can be made in a large pan, like triangles or rolls. I usually make triangles when I prepare these with my mom to make them look more appealing. Ingredients needed for this dish are 2 tsp Dill weed, 2 bunches of Parsley, 2 garlic cloves, spinach, 1 large onion, 4 eggs, black pepper, phyllo dough, feta cheese, cottage cheese, and olive oil. There are only 5 steps to this delicious recipe. First, make the filling in a large mixing bowl. Mix spinach, feta, parsley, onions, garlic, dill weed, and 4 large eggs. Second, place the phyllo sheets between 2 clean, damp paper towels, keeping them from tearing too much as you assemble the mixture into it. Third, lay one sheet of phyllo down and brush olive oil on top. Fourth, put a layer of the mixture onto the sheet and roll it up. Lastly, put them in a Ziploc bag to go into the fridge to set. To cook this dish, preheat the oven to 375 and cook it for 25 minutes. This dish is delicious and perfect for if you're fasting or vegan. It turned out perfect with lots of flavor. 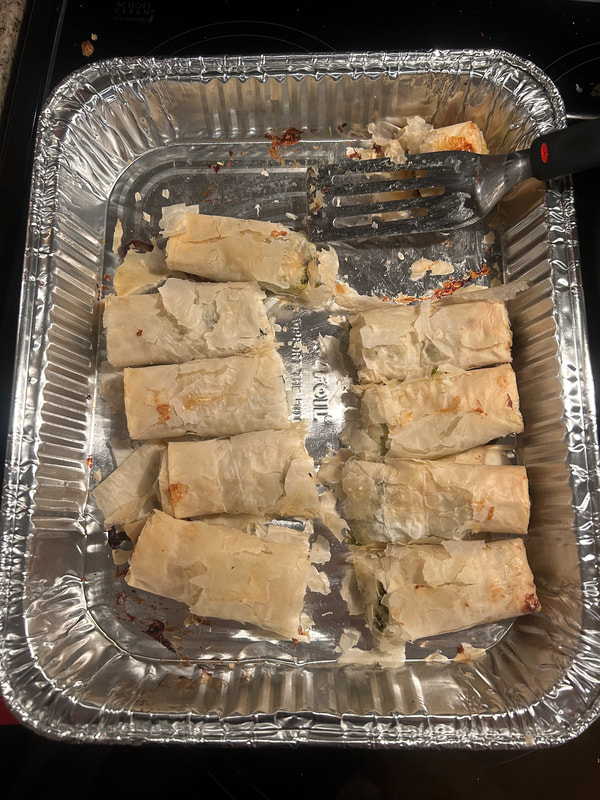
Back to Blog
Week 5: Potatoes and Asperagus3/24/2024 For week 5, I made another dinner meal for my family and me. We had oven-roasted potatoes and asparagus. This recipe goes well with everything and is on the healthy side. You can put it together quickly and it cooks all in one pan. This makes for fewer dishes and much less cleanup. This week I switched it up and made a side for the meal instead of making a whole meal. While I made the potatoes and asparagus my mom made salmon as the main course. Potatoes and asparagus are a classic combination that goes so well together. They are both loaded with flavor and nutrition and when combined they make the best healthy side dish. Just like this oven, roasted potatoes, and carrots or green beans and Potatoes are equally good and easy to make. We also love these epic air fryer baked potatoes. Any type of potatoes will work in this roasted potatoes and asparagus recipe as long as you cut them into 1-inch pieces so they cook faster and get perfectly crispy. I used a combination of baby red and gold potatoes for color, which was delicious. For this recipe, ingredients include a bunch of asparagus, potatoes, garlic powder, avocado oil, pepper, salt, Italian seasoning, and paprika. I wanted to make a meal that was delicious and healthy, this dish is gluten-free and vegan Paleo. The first step is to prepare the veggies. Cut the potatoes and trim the ends of the asparagus. The second step is to season. Place the potatoes into a bowl and in a smaller bowl mix up the seasoning with the oil, salt, and pepper and coat the potatoes in the seasoning. Add the asparagus to a separate bowl and season it with a little oil, salt, and pepper. The final step is to cook them. Transfer the seasoned potatoes to a line baking sheet and roast them and 400 degrees F in the oven for 45 minutes. After 45 minutes, add the asparagus to the pan and place everything back into the oven for 10 more minutes. This meal was delicious and easy to serve! 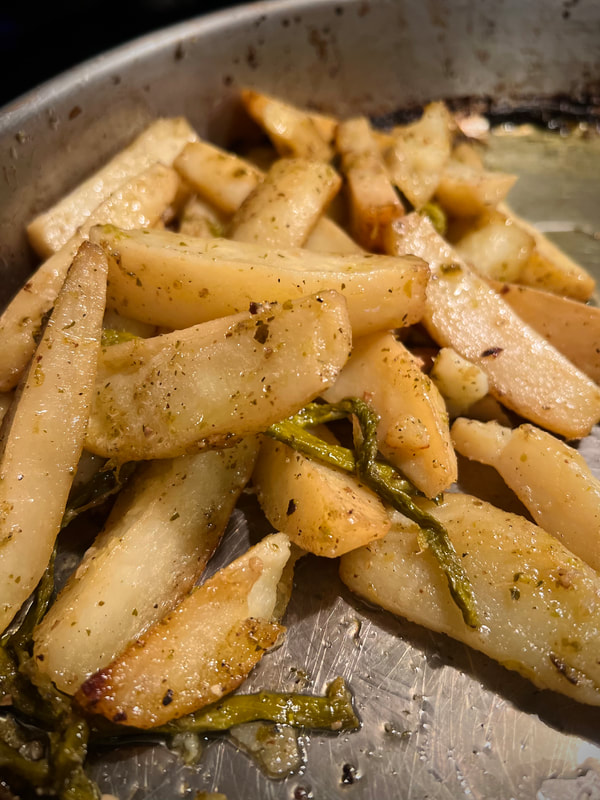
Back to Blog
Week 4: My first dinner meal3/17/2024 This was the first dinner meal I made for my family and our guests. You can make lasagna in many different ways, but lasagna with meat sauce and Italian sausage has the best flavor. Italian sausage gives it a unique and spicy flavor that is balanced perfectly with the use of a creamy layer of ricotta cheese. Lasagna is a popular Italian dish with lots of taste and enjoyment. First, use an oven over medium heat, to cook ground beef, Italian sausage, minced onion, and garlic until browned. Second stir in crushed tomatoes, tomato paste, tomato sauce, basil, and Italian seasoning. Third, add salt and pepper to taste and two tbsp chopped parsley. Simmer sauce for 1.5 hours with occasional stirring. Fourth in a mixing bowl, mix ricotta cheese, egg, and the remaining two tbsp of chopped parsley with 1/2 tsp salt. Preheat the oven to 375. Lastly, assemble lasagna using a 9 by 13-inch baking dish. Cook the dish for 25 minutes and let it sit for 10 minutes. There are 5 layers of the lasagna dish. The first layer with 1 1/2 cups of meat sauce. The second layer arranges precooked noodles over meat sauce to cover. Third, spread 1/2 of the ricotta mixture over the noodles. Fourth layer top the ricotta mixture with a third of the mozzarella cheese slices. In the fifth step spoon 1 1/2 of the meat sauce over the mozzarella and sprinkle with 1/4 cup Parmesan cheese. Repeat layers and top with remaining mozzarella and Parmesan cheese. This was a fun and good experience with my first time making a lasagna dish. It went better than planned and increased my skills in cooking. I am excited to make more dinners for my family and me from now on. 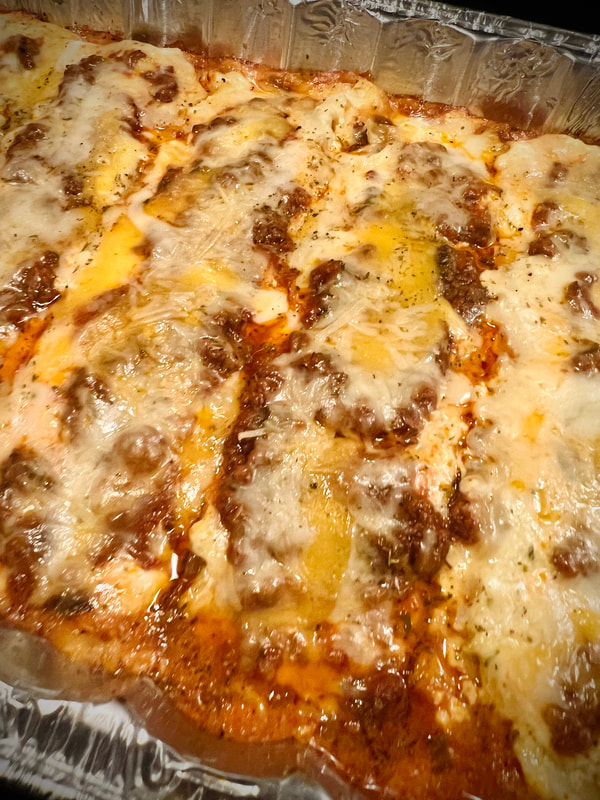
Back to Blog
Week 3: Making the cake pops3/11/2024 After a couple of weeks of planning, organizing, and waiting I finally attempted to make the Starbucks cake pops. Since I had already made these cake pops before I knew what steps and ingredients this recipe included. The ingredients used in the making were popsicle sticks, vanilla cake mix, chocolate melts, and cream cheese. The first step was I had to make the cake inside the cake balls by baking the cake. I gathered my ingredients to bake the cake including the cake mix, 3 eggs, vegetable oil, and water. I baked the cake for 25 minutes while preheated to 375 degrees. After the cake was baked I cut the sides of my cake so there were no burnt pieces. I then put the cake in a mixing bowl and mixed it in with half cream cheese. It then began to become moist and soft. When it was mixed all together I put the bowl in the fridge to cool for 10 minutes. Once the mixture was put together I made balls from the cake mix. I shaped the balls perfectly with an ice cream scooper to make sure they were all the same size and shape. After I made 20 perfectly shaped cake mix balls I put them in the fridge to form their shape while checking on them every 5 minutes to determine if they were done. After the 20 minutes was up I melted the chocolate for 20-second intervals. When the chocolate was melted I stuck a popsicle stick in the melted chocolate, stuck the stick inside the center of the cake balls, and dipped it into the melted chocolate. After I did the same steps on the rest of the cake pops and put them in the fridge for 10 minutes until hardened. The final step was a taste test. I gave them to my family to try first. In their opinion, my cake pops tasted delicious just like the Starbucks cake pops. In my opinion, they tasted alright but looked nothing like the Starbucks cake pops. I think next time I can improve on a couple of things including not putting too much cream cheese in the cake mix, and melting the chocolate not too long. Other than my mistakes I think my first attempt was a success.  |
